#Spring Security 주요 아키텍쳐 이해 spring security의 주요 아키텍쳐는 다음과 같다
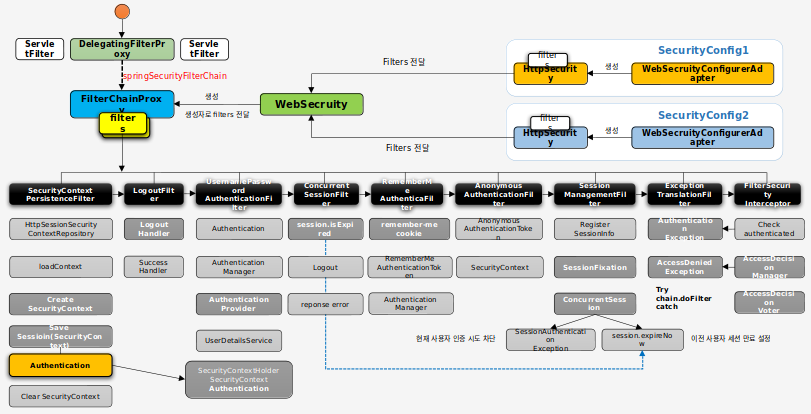
우리는 각 필터들이 어떤 역할을 하는 것인지 알아보고 이를 직접 구현해볼 것이다
#SecurityContextPersistenceFilter
SecurityContext객체의 생성, 저장, 조회를 담당한다
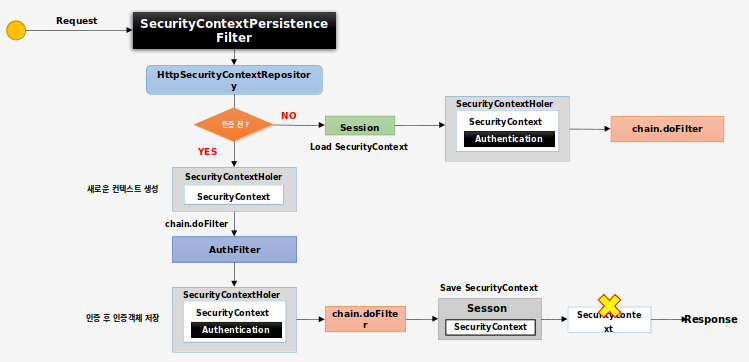
- 사용자 인증을 받기 전
SecurityContextRepository로부터 새로운SecurityContext를 받아SecurityContextHolder에 저장한다chain.doFilter()를 통해 최종 인증 객체Authentication을 받아SecurityContext에 저장한다SecurityContext를Session에 저장한다SecurityContextHolder.clearContext()를 통해SecurityContextHolder를 비운다
- 사용자 인증을 받은 후
Session에서SecurityContext를 꺼낸다chain.doFilter()를 진행한다
#UsernamePasswordAuthenticationFilter
사용자의 인증 이후 인증 정보를
Authentication객체에 저장한다
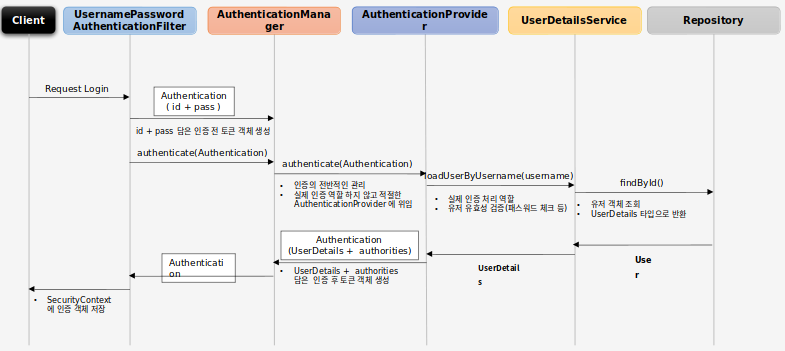
###AuthenticationManager
인증 처리 요건에 맞는
AuthenticationProvider를 찾아 인증처리를 위임한다
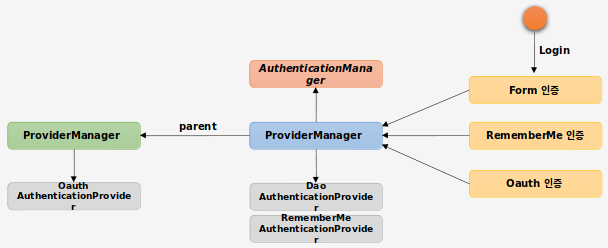
###AuthenticationProvider
자신의 인증처리 방식에 따라 인증 후 사용자 객체, 사용자 권한정보를 Authentication객체에 담아 return한다

#Custom Authentication Flow 구현하기 이제 DB와 연동하여 인증 기능을 구현해볼 것이다
제일 먼저 ID를 가져오는 UserDetailsService를 구현해보자
###UserDetailsService UserDetailsService인터페이스를 구현한 CustomUserDetailsService 클래스를 작성했다
다음은 해당 인터페이스의 loadUserByUsername()클래스를 구현한 것이다
1
2
3
4
5
6
7
8
9
10
11
12
13
14
15
public UserDetails loadUserByUsername(String username) throws UsernameNotFoundException {

        Account account = userRepository.findByUsername(username);
        if (account == null) {
            if (userRepository.countByUsername(username) == 0) {
                throw new UsernameNotFoundException("No user found with username: " + username);
            }
        }
        Set<String> userRoles = account.getUserRoles()
                                    .stream()
                                    .map(userRole -> userRole.getRoleName())
                                    .collect(Collectors.toSet());

        return new UserDetail(account, userRoles.stream().collect(Collectors.toList()));
}
이제 가져온 UserDetails 객체를 입력한 password와 비교하는 PasswordEncoder를 작성해보자
###PasswordEncoder
PasswordEncoder객체는 PasswordEncoderFactory를 통해 생성할 수 있다
1
2
3
4
@Bean
public PasswordEncoder passwordEncoder() {
    return PasswordEncoderFactories.createDelegatingPasswordEncoder();
}
createDelegatingPasswordEncoder()메서드는 bcrypt방식을 default로 사용하는 PasswordEncoder를 return한다
물론 다른 방식으로도 인코딩을 진행할 수 있도록 작성해놓았다
1
2
3
4
5
6
7
8
9
10
11
12
13
14
15
16
17
18
19
20
21
public class PasswordEncoderFactories {
    public static PasswordEncoder createDelegatingPasswordEncoder() {
        String encodingId = "bcrypt";
        Map<String, PasswordEncoder> encoders = new HashMap();
        encoders.put(encodingId, new BCryptPasswordEncoder());
        encoders.put("ldap", new LdapShaPasswordEncoder());
        encoders.put("MD4", new Md4PasswordEncoder());
        encoders.put("MD5", new MessageDigestPasswordEncoder("MD5"));
        encoders.put("noop", NoOpPasswordEncoder.getInstance());
        encoders.put("pbkdf2", new Pbkdf2PasswordEncoder());
        encoders.put("scrypt", new SCryptPasswordEncoder());
        encoders.put("SHA-1", new MessageDigestPasswordEncoder("SHA-1"));
        encoders.put("SHA-256", new MessageDigestPasswordEncoder("SHA-256"));
        encoders.put("sha256", new StandardPasswordEncoder());
        encoders.put("argon2", new Argon2PasswordEncoder());
        return new DelegatingPasswordEncoder(encodingId, encoders);
    }

    private PasswordEncoderFactories() {
    }
}
###최종 AuthenticationProvider 위에서 작성한 인증 클래스들을 조합하여 최종 AuthenticationProvider를 작성해보자
다음은 AuthenticationProvider의 authenticate 메서드를 구현한 것이다
1
2
3
4
5
6
7
8
9
10
11
12
13
14
15
16
17
18
19
20
21
22
23
24
25
26
27
28
29
30
31
32
33
34
@Override
@Transactional
public Authentication authenticate(Authentication auth) throws AuthenticationException {

    String loginId = auth.getName();
    String passwd = (String) auth.getCredentials();

    UserDetails userDetails = null;
    try {

        // 사용자 조회
        userDetails = userDetailsService.loadUserByUsername(loginId);

        if (userDetails == null || !passwordEncoder.matches(passwd, userDetails.getPassword())) {
            throw new BadCredentialsException("Invalid password");
        }

        if (!userDetails.isEnabled()) {
            throw new BadCredentialsException("not user confirm");
        }

    } catch(UsernameNotFoundException e) {
        log.info(e.toString());
        throw new UsernameNotFoundException(e.getMessage());
    } catch(BadCredentialsException e) {
        log.info(e.toString());
        throw new BadCredentialsException(e.getMessage());
    } catch(Exception e) {
        log.info(e.toString());
        throw new RuntimeException(e.getMessage());
    }

    return new UsernamePasswordAuthenticationToken(((UserDetail)userDetails).getAccount(), null, userDetails.getAuthorities());
}
최종적으로 Authentication 객체를 return해야 하는데
우리는 UsernamePasswordAuthenticationFilter를 사용하므로 UsernamePasswordAuthenticationToken 구현체를 return한다
첫번째 인자로 Object타입 user객체를 받고, 세번째 인자는 Collection<? extends GrantedAuthority>타입 권한 객체를 받는다.
세번째 인자는 Object타입 credentials인데 이는 보안 이슈로 인해 null 처리하는것이 좋다고 한다
###Custom Authentication Manager 적용하기 만든 Authentication Manager를 적용하려면 @configuration설정 파일에 해당 클래스를 등록해야 한다
1
2
3
4
@Override
protected void configure(AuthenticationManagerBuilder auth) {
    auth.authenticationProvider(authenticationProvider());
}
이제 서버를 기동하면 우리가 작성한 인증 프로세스가 동작한다
Spring Security는 이러한 기본 기능들 이외에 추가적인 기능들을 제공하는데 이번엔 그 기능들을 알아보자
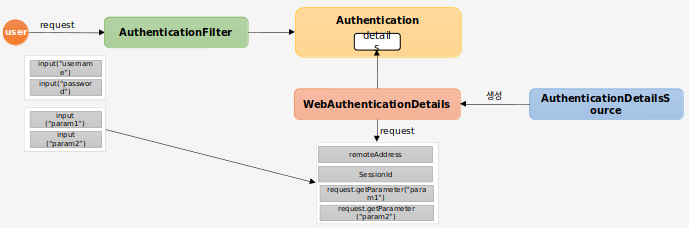
###WebAuthenticationDetails, WebAuthenticationDetailsSource
인증 파라미터(id, password)들을 제외한 다른 파라미터, 요청 IP, Session Id 등의 정보를 제공한다
이 기능을 사용하려면 WebAuthenticationDetails 객체가 필요한데 이 클래스는 WebAuthenticationDetailsdSource 클래스가 생성한다
이제 각 클래스들을 작성해보자
다음은 “code” 파라미터를 받아 추가적으로 비교하는 로직을 작성한 것이다
1
2
3
4
5
6
7
8
9
10
11
12
13
14
15
16
public class FormWebAuthenticationDetails extends WebAuthenticationDetails {

    private static final long serialVersionUID = 1L;

    private final String verificationCode;

    public FormWebAuthenticationDetails(HttpServletRequest request) {
        super(request);
        verificationCode = request.getParameter("code");
    }

    public String getVerificationCode() {

        return verificationCode;
    }
}
1
2
3
4
5
6
7
@Component
public class FormWebAuthenticationDetailsSource implements AuthenticationDetailsSource<HttpServletRequest, WebAuthenticationDetails> {
    @Override
    public WebAuthenticationDetails buildDetails(HttpServletRequest request) {
        return new FormWebAuthenticationDetails(request);
    }
}
작성한 클래스들을 적용하려면 @Configure클래스의 configure(HttpSecurity httpSecurity)메서드에 정의해주면 된다
1
2
3
4
5
6
7
@Override
protected void  configure(HttpSecurity httpSecurity){
    httpSecurity
                    .(...)
                    .authenticationDetailsSource(authenticationDetailsSource)
                    .(...)
}
###CustomAuthenticationSuccessHandler, CustomAuthenticationFailureHandler
인증 성공, 실패시 동작할 로직들을 정의한다
위 기능들도 주어진 클래스들을 오버라이드하여 사용할 수 있다
1
2
3
4
@Override
public void configure(HttpSecurity http) throws Exception {
    http.formLogin().successHandler(CustomAuthenticationSuccessHandler())
}
1
2
3
4
5
6
7
8
@Override
public void onAuthenticationSuccess(HttpServletRequest request, HttpServletResponse response, Authentication authentication) throws IOException {
        RequestCache requestCache = new HttpSessionRequestCache(); // 요청 캐시와 관련된 작업
        final HttpSession session = request.getSession(false); //  세션 관련 작업
        Object principal = authentication.getPrincipal() // 인증된 사용자 관련작업
        redirectStrategy.sendRedirect(request, response, targetUrl);  // 인증 성공 후 이동
    }
}
1
2
3
4
@Override
public void configure(HttpSecurity http) throws Exception {
    http.formLogin().failureHandler(CustomAuthenticationFailureHandler())
}
1
2
3
4
5
6
7
8
9
10
@Override
public void onAuthenticationFailure(HttpServletRequest request, HttpServletResponse response, AuthenticationException exception) throws IOException {
       if (exception instanceof UsernameNotFoundException) {
            errorMessage = messages.getMessage(“사용자가 존재하지 않습니다.", null, locale);
        } else if (exception instanceof BadCredentialsException) {
            errorMessage = messages.getMessage("아이디 혹은 비밀번호가 일치하지 않습니다.", null, locale);
        } else {
            errorMessage = "인증에 실패했습니다. 웹 마스터에게 문의하십시오.!";
        }
}
###AccessDeniedHandler
인증 후 인가되지 않은 자원에 접근할 때 처리할 로직을 정의한다
1
2
3
4
5
@Override
public void configure(HttpSecurity http) throws Exception {
    http.exceptionHandling().accessDeniedPage(“/accessDenied")
			.accessDeniedHandler(accessDeniedHandler)
}
1
2
3
4
5
6
7
8
9
@Override
public void handle(HttpServletRequest request, HttpServletResponse response, AccessDeniedException accessDeniedException) throws IOException, ServletException {

	String deniedUrl = errorPage + "?exception=" + accessDeniedException.getMessage();
	response.sendRedirect(request, response, deniedUrl);
}
public void setErrorPage(String errorPage) {
        this.errorPage = errorPage;
}