# Spring Security란? 필자는 이전에 필터를 사용해 로그인 처리를 직접 구현한 경험이 있다.
그리 복잡하지 않았던 프로젝트임에도 불구하고 페이지가 추가될때마다 추가적인 설정을 해주는 것이 매우 불편했다
실제 서비스에서 이렇게 귀찮은 일을 할리가 없다고 생각하여 이러한 기능을 구현한 라이브러리가 있는지 찾아보았다
아니나다를까 Spring 프로젝트의 하위 프로젝트로 Spring Security라는 것이 있었다
그렇다면 Spring Security란 어떤 프로젝트일까?
위키에 정의된 Spring Security는 다음과 같다
Spring Security는 엔터프라이즈 애플리케이션에 대한 인증, 권한 부여 및 기타 보안 기능을 제공하는 Java / Java EE 프레임 워크입니다.
정리를 해보자면 다음 3가지 기능을 제공한다는 것이다
- 인증 (Authentication)
- 인가 (Authorization)
- 기타 보안 기능 (ex. OAuth 2.0)
그렇다면 Spring Security는 어떤 방식으로 이를 구현했을까?
Spring Security는 기본적으로 필터를 통해 이를 구현한다
스프링 필터에 대한 내용은 이전 포스팅을 참고하자 이제 Spring Container의 최초 설정부터 사용 예시까지 천천히 따라가면서 알아보자
Spring Security 설정하기
Spring Security를 사용하기 위해 의존성 추가를 해주자 Maven의 경우 다음 dependency를 설정하면 된다
1
2
3
4
<dependency>
    <groupId>org.springframework.boot</groupId>
    <artifactId>spring-boot-starter-security</artifactId>
</dependency>
의존성 추가를 진행해주면 서버가 기동되면서 초기화 작업 및 보안 설정이 이루어진다
아무런 설정을 해주지 않으면 기본적인 웹 보안 기능이 시스템에 연동되어 작동한다 주소롤 접속하면 다음과 같은 인증 페이지가 제공된다
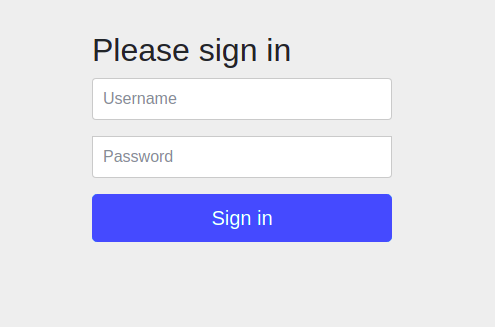
로그인에 제공되는 기본 계정이 하나 있는데 인증 정보는 다음과 같다
1
2
username: user
password: 랜덤 문자열(콘솔에 출력됨)

위 정보를 입력하면 인증이 완료되고 원하는 자료(/)에 접근할 수 있다
하지만 우리는 계정 추가, 권한 추가, DB 연동 등을 추가적으로 설정하고 싶다
이제 설정을 추가해보자
설정 파일 적용하기
먼저 @Configuration, @EnableWebSecurity 어노테이션을 적용한 Config 클래스를 하나 만들자
설정을 추가하려면 WebSecurityConfigurerAdapter 클래스의 configure(HttpSecurity http) 메서드를 오버라이드해야 한다
그리고 API 설정을 통해 원하는 설정을 적용할 수 있는데 일단 기본적인 설정을 먼저 살펴보자
1
2
3
4
5
6
7
8
9
10
11
12
13
@Configuration
@EnableWebSecurity
public class SecurityConfig extends WebSecurityConfigurerAdapter {

    @Override
    protected void configure(HttpSecurity http) throws Exception {
        http
                .authorizeRequests()
                .anyRequest().authenticated()
            .and()
                .formLogin();
    }
}
- authorizeRequest() : 처리에 Http를 사용한다는 것을 의미(HttpServletRequest)
- anyRequest().authenticated() : 모든 요청에 대해 인증을 받도록 하는 설정
- formLogin() : form 방식으로 로그인 요청을 하겠다는 의미
인증 성공, 인증 실패시 로직 추가하기
추가적인 API 설정을 통해 인증 성공, 인증 실패시 로직을 추가할 수 있다
1
2
3
4
5
6
7
8
9
10
11
12
13
14
15
16
17
18
19
20
21
22
23
24
25
26
27
28
29
30
@Override
protected void configure(HttpSecurity http) throws Exception {
    http
            .authorizeRequests()
            .anyRequest().authenticated()
        .and()
            .formLogin()
            .loginPage("/loginPage")
            .defaultSuccessUrl("/")
            .failureUrl("/login")
            .usernameParameter("userId")
            .passwordParameter("passwd")
            .loginProcessingUrl("/login_proc")
            .successHandler(new AuthenticationSuccessHandler() {
                @Override
                public void onAuthenticationSuccess(HttpServletRequest request, HttpServletResponse response, Authentication auth) throws IOException, ServletException {
                    System.out.println("request success = " + request.getRequestURI());
                    response.sendRedirect("/");
                }
            })
            .failureHandler(new AuthenticationFailureHandler() {
                @Override
                public void onAuthenticationFailure(HttpServletRequest request, HttpServletResponse response, AuthenticationException e) throws IOException, ServletException {
                    System.out.println("e = " + e.getMessage());
                    response.sendRedirect("/login");
                }
            })
            .permitAll()
    ;
}
- loginPage(“/login”) : 로그인을 요청할 페이지를 설정
- defaultSuccessUrl(“home”) : 로그인 성공 후 이동할 페이지를 설정
- failureUrl(“/login?error=true”) : 로그인 실패 후 이동할 페이지를 설정
- usernameParameter(“userId”) : 로그인 폼의 username Input 태그의 name값
- passwordParameter(“passwd”) : 로그인 폼의 password Input 태그의 name값
- loginProcessingUrl(“/login”) : 로그인 폼의 action값
- successHandler(loginSuccessHandler()) : 로그인 성공 후 핸들러
- failureHandler(loginFailureHandler()) : 로그인 실패 후 핸들러
Spring Security 주요 아키텍쳐 이해
가장 간단한 설정 클래스를 만들어 사용해 보았다
서버가 기동되면 위 설정 클래스를 어떻게 적용하는지 알아보자
###FilterChainProxy 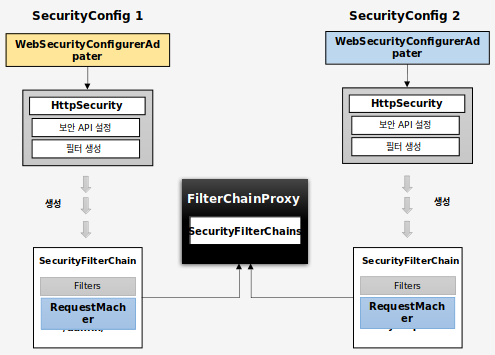
- 서버가 기동되면 @Configure 설정 파일들을 읽는데 우리가 작성된 설정클래스들도 읽힌다
WebSecurityConfigurerAdapter는 우리가 작성한configure메서드를 읽어 보안 API를 설정하고 필터를 생성한다- 기본적으로 적용될 필터들과 생성된 필터들을 엮어
SecurityFilterChain을 만들어 return한다 - 각 설정파일로부터 만들어진 SecurityFilterChain들은
FilterChainProxy의 리스트 형식으로SecurityFilterChains에 저장된다
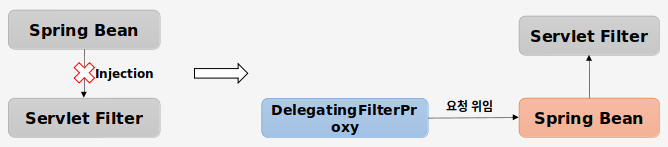
###DelegatingFilterProxy 설정을 완료하고 서버를 기동하면 DelegatingFilterProxy라는 서블릿 필터가 추가된다
우리가 작성한 @Configure클래스는 스프링 컨테이너에 등록된 스프링 빈인데 서블릿 필터는 스프링 빈을 사용할 수 없다
따라서 특정한 이름을 가진 스프링 빈에게 요청을 위임하게 되는데 이것이 바로 FilterChainProxy이다
이제 FilterChainProxy생성을 완료했다
사실 이 FilterChainProxy는 Spring Container 내부에 존재하는 스프링 빈이다
실제 Security 기능의 시작은 DelegatingFilterProxy 서블릿 필터이다
생성된 FilterChainProxy와 DelegatingFilterProxy는 “springSecurityFilterChain”이라는 이름으로 초기화되고
이 이름으로 서블릿 필터와 스프링 빈이 연결된다
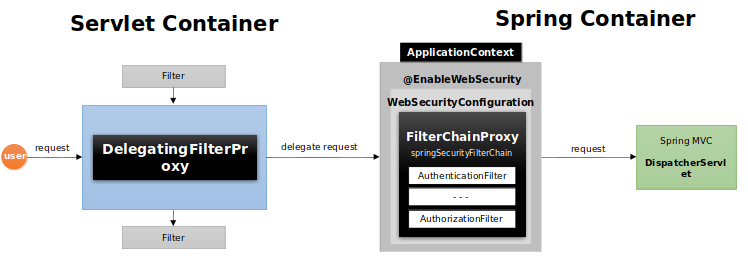
이제 모든 초기화 과정이 완료되었다
다음 포스팅에서는 상황별로 세부적인 필터들의 동작에 대해 작성해 보겠다